Assignment Two

Three’s A Crowd? 

Brie

Create a series of between six and ten photographs from one of the following options, or a subject of your own choosing:

  • Crowds
  • Views
  • Heads

Use the exercises from Part Two as a starting point to test out combinations of focal length, aperture and viewpoint for the set. Decide upon a single format, either vertical or horizontal. You should keep to the same combination throughout to lend coherence to the series.

Crowds make a great subject for photography, not least because they are so contemporary. A city rush hour is a good place to start but events also offer great opportunities to photograph the crowd rather than the event. The foreshortened perspective of the telephoto lens will compress a crowd, fitting more bodies into the frame, but it can also be used to pick out an individual person. A wide-angle lens can capture dynamic shots from within the action. I have chosen to concentrate on crowds. 

What is a crowd and how is this linked to photography?  

  • A crowd is a gathering of people, large or small, in a certain place at a certain time. A photograph is an image taken at a certain place at a certain time.
  • Crowds are not there forever, but they gather and disperse. Photos are there in their entirety, they do not disperse and do not gather. They are created in an instant (usually).
  • Crowds can be read. Photographs can be read. They are both a sort of language.
  • Crowds can be large or small. Photographs also come in different sizes.
  • Both can show emotion, be violent, appreciative, sad, ecstatic etc.
  • Both can be colourful.
  • Crowds have a purpose. All photographs have a purpose too, at the time of taking, as this is why the photographer takes the shot.
  • Crowds and photos tell a story.
  • Both form opinion of the participant.
  • Crowds are not conformed by shape; photography is made “in frame”.
  • Crowds can be planned and controlled, as can photos.
  • Both can be policed and subject to censorship.
  • Crowds are managed, photographs are composed.
  • Both involve people and are world-wide.
  • People in a crowd can stand out from the crowd and so can images stand out too.
  • It is my intention to bring this link together, showing some of the main characteristics of both. I have not just simply shot a large group of people.  I have tried to tell the story of the crowd by using the different techniques learned.

The shoot was not planned. I headed off to Sheffield in search of a crowd as my home town is somewhat of a ghost town. I did not have a theme, just the words “crowds” to play with.

I have used a number of different techniques I have learned so far. This is also the first set of images that contain people. None of the images are captioned, with the exception of the basic Exif data, as I want the spectator to think about each image and what it means. They are also ambiguous.

Demonstration of technical and visual skills

I have used a selection of apertures ranging from f2.8 to f11. My place for the crowd was Sheffield train station and I tried to encompass the surroundings into the image where possible, giving the crowd context. All of the images were hand-held shots and shots and decisions were made in an instant.

Image 1 starts with how crowds gather at the station, as the crowd begin buying their tickets.  The aperture used keeps the majority of the image sharp and the angle of the shot with the lines of the floor and ticket machines take you down the line.

Image 2 was designed to show the frustration people feel with waiting for trains. I have kept the background of the line and surrounding station in focus to place the crowd. I have also tried to concentrate on the faces of the passengers as they wait.

Image 3 uses diagonals to draw you through the image. The aperture keeps the main players in the image in clear focus as it does the train. Due to shooting in Aperture mode there is no direct control over shutter speed, so you have to compromise at times.

Image 4 shows the crowd in the background and also how people can stand out from the crowd. (literally). Due to the aperture used the main crowd in the background can be seen.

Image 5 would have the majority of players in focus if they were still. The train is pretty much in focus and so are the reflections. However, I wanted to create some idea of movement, yet keep the lady at the front of the image as the main player.

Image 6 has people beginning to exit the station. The light was just right to capture the lady in the top left third. With a large aperture I tried to make her stand out from the crowd and the relatively slow shutter speed has created some motion blur.

Image 7 is of the crowd dispersing. It shows also how some people do not belong to the “in crowd” and how people just ignore those less fortunate. I have tried to keep the majority of this image in focus but use the wall and the paving to lead the viewer to the man begging, with his cap in front of him. The behaviour of the 2 teenagers is completely contrasted to that of the beggar.

Quality of outcome

I am happy with how the story unfolds and I have tried to think outside of the box, by not simply photographing a crowd, but I have tried to apply some creativity to the brief. I could have used more images of crowds, but I did not feel this set needed further images.

Demonstration of creativity

I have shown what crowds are, how people stand out from the crowd and how some less fortunate do not belong to the “in crowd”. The images have been shot from different angles. Head height, on stair cases, from the floor and sat on a wall. I have stood back from the crowd and also been in the thick of things. I have continued with my theme of not being afraid to make a “political” point, by including the poor man begging in the last image.

Context

On reflection, I may have been better shooting a few more images, further showing “crowds” but I did not want to detract from my story. One aspect I would have liked to incorporate more into my story was the use of wider apertures (smaller f stops) having looked at and enjoyed Gianluca Cosci’s work, but I felt too worried about losing my background and placement. This use of small apertures may have helped create a bit more tension and mystery in some of the images. I could have been more varied in my use of lenses but I was shooting in the instant.


Reference List for Imaginative Spaces

Barnes, R (1993) Camer Lucida, 2nd edn., London, England : Vintage Classics.

Bauhaus (08/10/2016) Bauhaus Movement | Magazine & News, Available at: http://www.magazine.bauhaus-movement.com (Accessed: 11/10/2016).

Berger, J (2013) Understanding a photograph, 13th edn., St Ives, Cornwall, England: Clays Ltd.

Grepstad, J (1996) Pinhole photography history and guide from photo.net, Available at: http://photo.net/pinhole/pinhole (Accessed: 11/10/2016).

Kirkpatrick, K (2016) Early Works, Available at: http://www.kimkirkpatrick.com/GalleryMain.asp?GalleryID=97163&AKey=FGWAF5R9 (Accessed: 17/10/2016).

Kuhn, M (2016) Collections Acido-Derado, Available at: http://www.monakuhn.com/collections/view/acido-dorado/ (Accessed: 17/10/2016).

Lima, M G (2016) The introduction to the history of photography:Group f/64, Available at: http://photographyhistory.blogspot.co.uk/2012/04/group-f64-manifesto-1932.html (Accessed: 20/10/2016).

Nikon (2014) Nikon | Imaging Products | DSLR Camera Basics | Perspective , Available at: http://imaging.nikon.com/lineup/dslr/basics/19/03.htm (Accessed: 16/10/2016).

The Phillips Collection (2014) What is a cyanotype, Available at: http://blog.phillipscollection.org/2012/05/04/what-is-a-cyanotype/ (Accessed: 11/10/2016).

Unknown (May 2005) Fay Godwin homepage, Available at: http://www.faygodwin.com/bio.html (Accessed: 20/10/2016).

Weston, E (1948) Edward Weston The Photographer Documentary 1948. Unknown Director via YouTube. (Accessed 11/10/2016)

Wikipedia (12/09/2016) Anna Atkins – Wikipedia the free encyclopedia, Available at: https://en.wikipedia.org/wiki/Anna_Atkins (Accessed: 11/10/2016).

Exercise 2.4

20161020-oca-eyv-part-two-01
1/200, f8.00, ISO 200, 160mm, Pattern

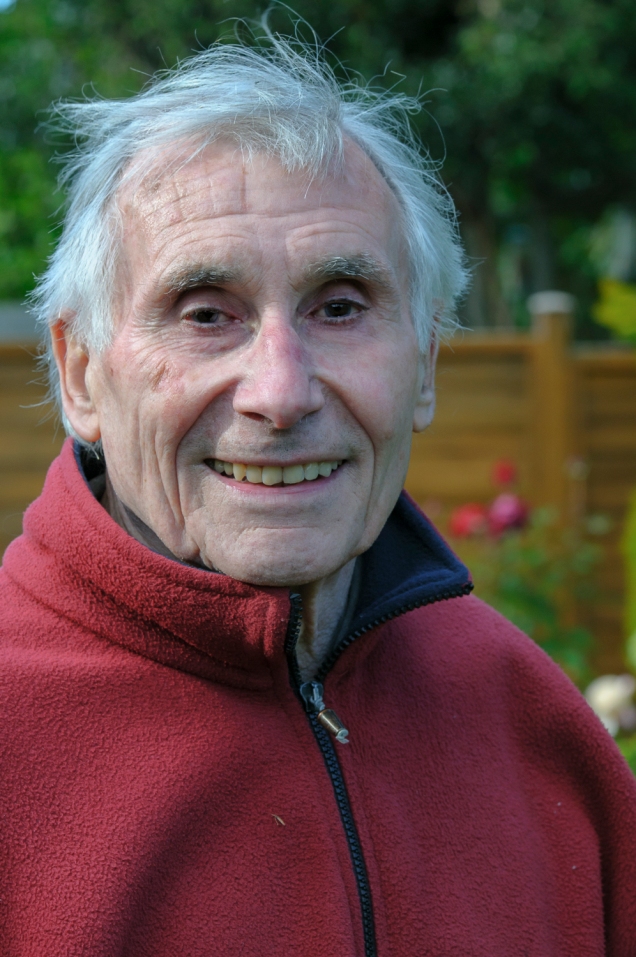
Say hello to my dad. He is 79 years old and he was more than willing to act as my model.

It was interesting to try to get him keep his eyes open, as he has a tendency to keep them almost  closed, and he squints due to his glaucoma. I also wanted to get a natural feel to the shot, which I feel has been achieved. I asked my dad to stand with his shoulders at an angle and asked him at first to look at the floor and slowly look up whilst thinking of the holidays we shared when I was a young child. This did not work, so I asked him to change this by moving his torso slowly from left to right, whilst holding the same thought.

 The notes for the exercise asks the student to use a wide aperture (small f-stop) and I decided upon f8 as i wanted to ensure with eyes were sharply in focus with the rest of his head. Dad’s eyes are interesting as they are naturally cloudy due to his age and glaucoma. In addition he has deep-set eyes and does suffer with dark patches around his eyes due to the medication he uses.

I chose to shoot outside with purely natural light and I have shot this without a reflector. The sun was shining down as you look at the image from left to right and was slightly behind my dad as I wanted to ensure the sun was not in his eyes.

The brief asked for a natural balanced portrait and I believe that this has been achieved due to the lighting and also due to the composition. Dad’s right eye sits nicely on the top left third. All of the face is sharp, with the background being blurred as a result of the aperture used with a small amount of bokeh apparent in the confer hedge in the background. The background whilst being blurred does add a warm feeling to the overall image due to the green and yellow shapes which can be clearly seen. The roses just over dad’s shoulder also gives this portrait a setting, thatch be identified and is something my dad loves, hence I included them in the shot.

I am quite happy with this shot and it has been treated with approved by my mum and dad. John Berger talks about photography having a language and images being read. It is my opinion this is easily read in a number of ways (though).

The shutter speed of 200 was needed due to the focal length of the lens and this also had a baring on the f stop as this was shot in Aperture mode.


Exercise 2.7

Maximum depth of field

I have used my widest angle of 24mm for the shots and the smallest aperture. I have had to crank up the ISO to 2500 in all of the images.  These images give a totally different feeling to those of exercise 2.6 as you are tempted into looking all around the images to see what you can see of interest and how this makes you feel.

Selects

My selects include the typical congregation view and that of the Priest and Deacon.

Exercise 2.6

Shallow depth of field

I have gone for the widest aperture I can with all of these images as I wanted my subjects to really stand out, whilst trying to keep in mind a sense of all round framing and composition. I have used a variety of different and unusual angles for the shots which has helped with the framing. Each individual shot has a clear main subject but there is also an element of interest within the background. This interest may be colour, shading or other objects which add to the images.

My selects 

I am not going to comment on why these are my selects, as I do not want any of my comments to subtract anything from the images.

Exercise 2.5

Before I comment on the two images I want to explain how I was harassed by a security guard when taking these 2 images. The images were taken at the main multi storey car park in Rotherham. I parked on the top floor, as I knew I would get some decent views from up there and stand a chance of fulfilling the brief of this exercise. I had taken 2 images when this “gentleman” appeared, telling me I had to stop taking photographs as it was illegal. I asked why it was illegal to take pictures of the church, explained what I was doing and why, but all to no avail. I showed him the images to prove what I had taken. Rotherham has been in the news for all the wrong reasons, but this was way over the top. I asked him under what law it was illegal, but this appeared not to register and he just said he would have to get the police.

Later the same day I was shooting in Rotherham town and approached by the police and was asked to show them what I was doing. What a sad state of affairs this is. Anyway on with the images.

The shots were hand-held, so there is a slight movement in framing, but nothing substantial and nothing that interferes with the concept.

In the first image where the Parish Church (Church of England) and its’ surroundings are in focus your eye tries to ignore the white vertical lines and you are trying to filling the blanks. You look and acknowledge the background, with the foreground adding a sense of depth and maybe frustration that you cannot resolve the while of the image. The foreground is also used as framing for the main subject of the church.It also leaves me with a question when viewing this as to where this was taken. Why is this behind bars, what are the bars.

The second image makes me think less about the background as my eyes are ignoring the blurry parts of the image and I am left trying to resolve what are the bars, and what is the purpose and story behind the image. There is perhaps not enough interest generated by the bars, as there are static vertical lines. But I am asking myself again what is the purpose of this image and what its’ subject is.

The brief states the that if the focus point is in the foreground the image generally will feel more comfortable, which is something that I would normally agree with, but on this occasion, I feel my images do not conform to that viewpoint due to the nature of the foreground object.

Having reviewed the images on my blog I am now not convcined that I am right with my above statement. There is an air of ease about image 2, but I still think the first image works better due to the foreground object chosen.
 

Part Two. Imaginative Spaces background research.

The weather outside is only suitable for ducks with waterproof thermal underwear, so I have spent the morning with some research which will give me a good grounding with Part Two. On reading the tutorial section in full again, it appears as the this will be dedicated to depth of field. My camera is set to Aperture Priority and I most certainly will not be using Auto ISO. Please watch this space as my work will include people, one of my points I have picked up from previous projects. The start to Part Two is a excise in history and has been fascinating. This will be my first post on research for this Part of the course.

The First Pinhole Photographs

Sir David Brewster, a Scottish scientist, was one of the first to make pinhole photographs, in the 1850s. He also coined the very word “pinhole”, or “pin-hole” with a hyphen, which he used in his book The Stereoscope, published in 1856. Joseph Petzval used the term “natural camera” in 1859, whereas Dehors and Deslandres, in the late 1880s, proposed the term “stenopaic photography”. In French today “sténopé” is used for the English “pinhole”. In Italian a pinhole camera is called “una fotocamera con foro stenopeico”. In German “Lochkamera” and “Camera obscura” are used. The Scandinavian languages tend to use the English “pinhole” as a model – “hullkamera”/”holkamera”/”hålkamera”, though “camera obscura” is also found, and is the term preferred by myself in Norwegian.”

frisius-htm

Image and text courtesy of http://photo.net/pinhole/frisius.htm accessed 11/10/2016.

Is this lady the first female photographer?

Anna Atkins 1799-1871. She self-published her “photograms” in  Photographs of British Algae: Cyanotype Impressions in October 1843.

untitled

Image courtesy of https://en.wikipedia.org/wiki/Anna_Atkins accessed 11/10/2016.

“Compared to other photographic printing processes, cyanotype is easy and inexpensive. No darkroom is needed, instead it uses the power of the sun and iron salt solutions rather than the silver salt solution of black and white photography. Ferric ammonium citrate and potassium ferricyanide are combined, and exposure to UV light creates ferric ferrocyanide, also known as Prussian Blue (named for the color of the Prussian military uniforms.) The cyanotype process was also used to create copies of technical and architectural plans, and these copies were called blueprints; even though the cyanotype process is no longer used, any construction document or detailed plan is still referred to as a blueprint.”

Text courtesy of http://blog.phillipscollection.org/2012/05/04/what-is-a-cyanotype/ accessed 11/10/2016.

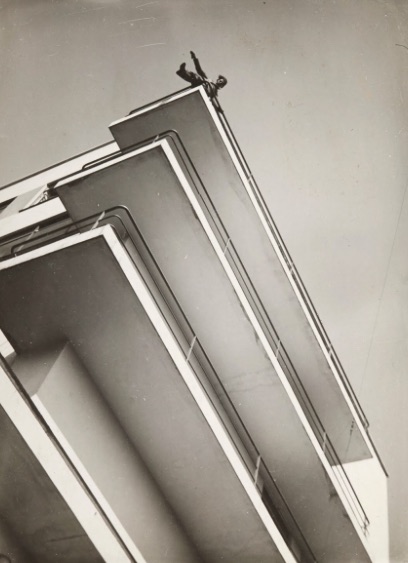
“Laszlo Moholy-Nagy. American, born Hungary, 1895-1946. Laszlo Moholy-Nagy possessed one of the liveliest and most versatile minds to come out of the revolution in artistic thinking that occurred in Europe after the First World War. In addition to being a painter, designer, and photographer, Moholy was perhaps the most persuasive and effective theoretician of the concept of art education that grew out of the Bauhaus, the experimental design school that flowered briefly in Germany during the days of the Weimar Republic.”

untitled
Image by Maholy-Nagy
untitled
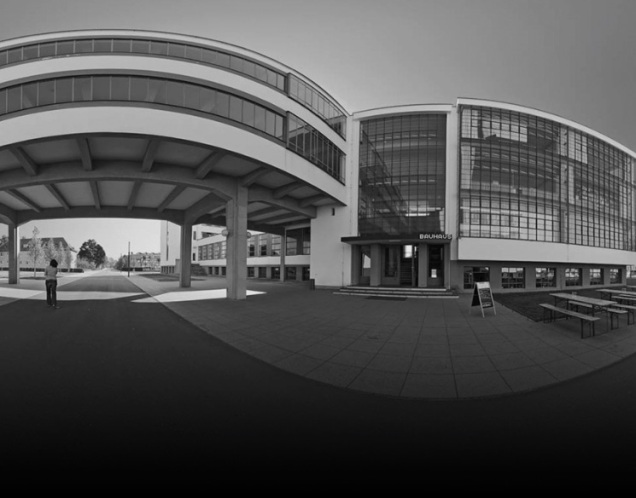
The Bauhaus (modernised)

“The State Bauhaus was founded by Walter Gropius as a school of arts in Weimar in 1919. As the Bauhaus was a combination of crafts and arts, its nature and concept was regarded as something completely new back then. Today, the historical Bauhaus is the most influential educational establishment in the fields of architecture, art and design. The Bauhaus existed from 1919 to 1933 and today the world considers it to be the home of the avant-guard of classical modern style in all fields of liberal and applied arts. The resonance of the Bauhaus can still be felt today, essentially characterizing the image of German design abroad.”

Images and text courtesy of http://www.magazine.bauhaus-movement.com accessed 11/10/2016.

…to be continued.